-
About the program

-
Settings
-
Work with the project
-
Message editor
-
Recipients list
-
Sending mail
-
Monitoring
-
About errors
-
How to…
-
Contacts
Unsubscribing the recipients
Deleting the addresses from the “Recipient List”
Using this tool you may quickly remove the recipients who do not want to receive your newsletter anymore. Click “Unsubscribe”/ “Mass delete” button at the “Recipients List” screen. The “Recipients List” can be updated in several steps:
Step 1. Choose the way of updating.
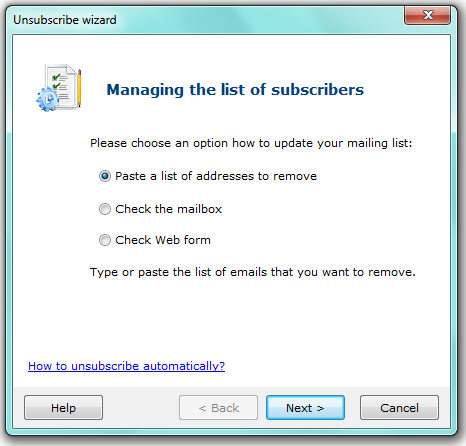
Paste a list of addresses to remove — paste the list of e-mail addresses during the next “Step 2″ to remove them from the mailing list.
Check the mailbox — the program will update the mailing list automatically after checking “REMOVE/UNSUBSCRIBE messages”. All the addresses these messages were sent from are deleted from the recipient list.
Check Web form — the program will check the web forms for subscribing and unsubscribing placed on your website. The latest information about un- /subscribing operations is found and the mailing list is updating according to it.
How to unsubscribe autpmatically? — look thruoght the detail information about Atomic Subscription Manager, the list manager.
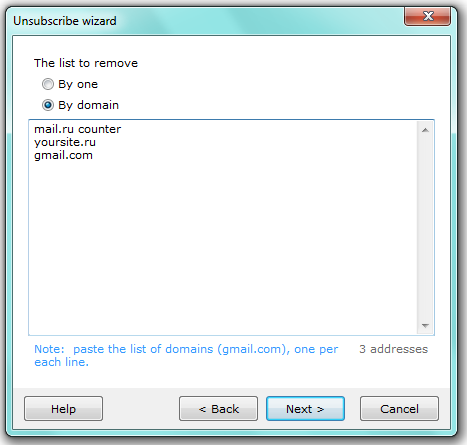
Step 2. Make up the list of addresses to remove
а) paste a list of addresses to remove
 |
 |
Here you need to provide a list of e-mail addresses and the way of the removal.
By one — paste a list of addresses to be deleted. The Atomic Mail Sender will exclude these e-mail addresses from the currently loaded mailing list.
By domain — specify domain names to be deleted from entire list. The Atomic Mail Sender will exclude e-mail addresses with specified domain name from the currently loaded mailing list.
Atomic Mail Sender removes input addresses from the current recipient list and renew it automatically.
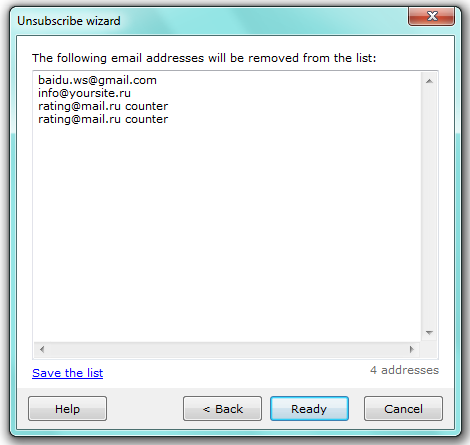
Save the list — save the current list of addresses to delete as a .txt file.
Note. You need to write e-mail addresses and domains manually or insertr from the Clipboard.
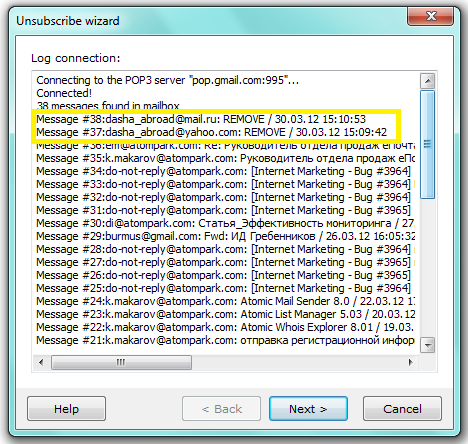
b) check the mailbox
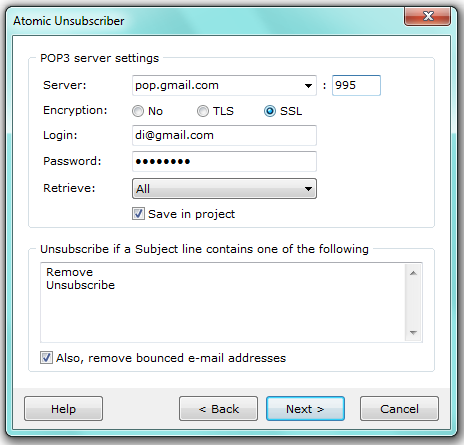
Put the POP3 server settings in the dialog window:
Server — input the POP3 server and the port
Encryption — choose the incryption if it’s necessary.
Login / Password — input your login (e-mail address or name) and password, according to the post service settings and specifications.
Retrieve — choose the criteria for REMOVE messages to recieve. Check in “Save in project” to update the mailing list of the current project automatically.
Save in project — save all the settings for the current project.
Also remove bounced e-mail addresses — if checked in, then all the e-mail addresses the sending fault for are deleted from the mailing list.
Atomic Mail Sender check the mailbox if there are any e-mails with settled theme for unsubscribing (“UNSUBSCRIBE/ REMOVE”) and remove all the addresses they were sent from.
 |
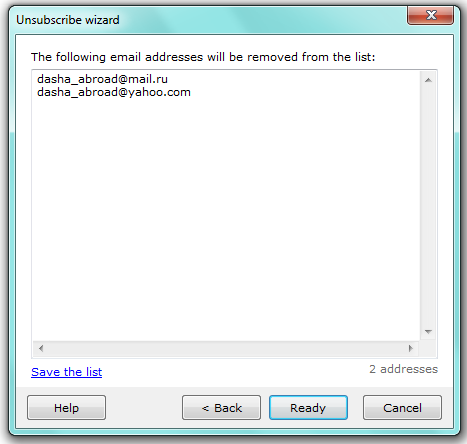 |
Save the list — save the current list of addresses to delete as a .txt file.
It’s important! All the collected data is deleted from the server automatically.
c) check the Web form
Place the Web forms for subscribing and unsubscribing recipients on your website.
How to use the scripts?
1) Download and unzip the archive with the scripts to a directory on your server. Contents of the archive:
- readme_en.txt — instructions;
- index.html — example of including the scripts into an html page;
- signup.php — script for processing subscribe requests;
- unsubscribe.php — script for processing unsubscribe requests;
- get_addresses.php — internal script.
2) Include a subscription/unsubscribe forms into the page you want, using “index.html” as an example.
For example, to include a subscription form use the code: <?php include_once ‘signup.php’ ?>
3) Both forms can work on the same page.
4) You can give your subscribers a direct link to the form with their email already filled in. For example:
http://yoursite.com/some/path/subscribe/?email=somebody@gmail.com
http://yoursite.com/some/path/subscribe.html?email=somebody@gmail.com
In this case when the user clicks the link their email is already filled in the form(s). The subscriber only needs to click the button.
5) For security purposes you need to modity the file named “get_addresses.php” and set your own mane for the list of subscribers, unsubscribed users and also the password for accessing the files from Atomic Mail Sender.
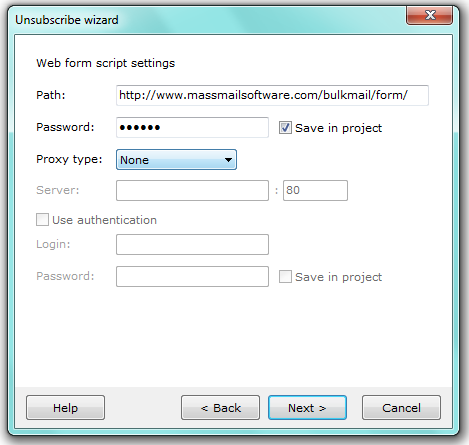
Path — write in the path to the forms of subscribing/ unsubscribing placed on your website.
Password — input the password for the access to the scripts (it must be written into the script code).
Save in project — save all the settings for the current project.
Proxy type — choose the type of poxy server if it’s necessary.
Server — input the proxy server and the port.
Use authentication — check in if necessary.
Login — input your login (e-mail address or name) according to server demands.
Password — input the password (to your e-mail).
 |
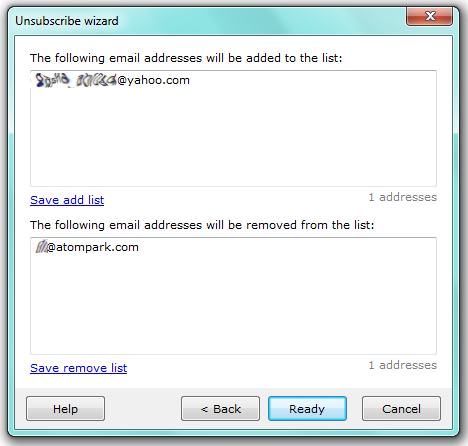 |
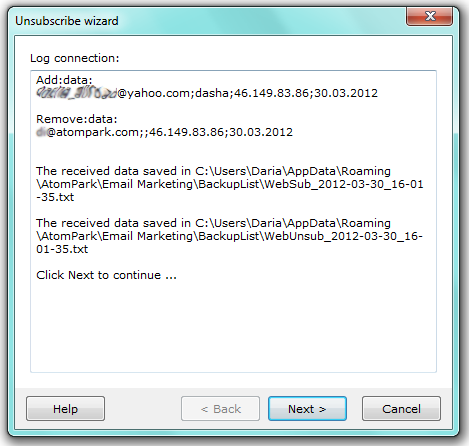
Save add/ remove list — save the list of e-mails to the text file.
It’s important! All the collected data is deleted from the server automatically.
If you want to buy Atomic Subscription Manager and get more information about its features go to our web site.